Tuesday, May 22, 2012

Custom 'Quote' T-shirt

Quick and easy way to get a ‘new’ shirt!


I was curious what the end result would look like if I wrote on a shirt with bleach.  I used a navy t-shirt I in my closet, a little bowl of bleach and voila! -  New shirt!
Turns out, it was fun and easy, and I like the finished product!

What you’ll need:
·      Dark t-shirt
·      Bleach
·      Glass bowl (to put a small amount of bleach in)
·      Q-tips
·      Newspapers and/or towel (to put in between the front and back of shirt when bleaching)
 
I took a navy blue shirt I already had but didn’t wear much- so I wasn’t concerned if I ruined it.

I decided what design I wanted on the shirt.  After thinking about it for a while, I decided to write ‘love and laughter.’   I usually sign letters or emails ‘love and laughter’ so I figured that would be perfect for my shirt!

First, I laid newspapers all over the table. Just in case any bleach spilled.  I also changed into clothes I wouldn’t care if they ended up bleached.

Then I put a towel between the layers of shirt (cardboard or newspaper work too).  When I do this again, I will also put a thick piece of cardboard on top of the towel so I have a harder surface to draw/ write on.

Now, I was ready to start.  I just dipped one end of the Q-tip in bleach, then wrote- carefully- on the shirt using the Q-tip like a pencil.

It took a little while for the bleach to soak in and ‘bleach’ the shirt.   I re-traced the places I thought needed it.  I added the three hearts, and I was done!

I recommend washing the shirt immediately (and by itself) to wash out the bleach.

And, now you have a new shirt!  I think I’m going to make more!


Saturday, May 19, 2012

Seven Years Ago

 
Seven years ago today, a little black lab came into this world.  Roughly three months later, he became part of our family and forever changed my life.  Exactly two weeks before his birthday, six short years later, he was gone.

I tell myself that I don’t miss him.

I don’t miss being awakened from a nap by a slobbery kiss or cold wet dog nose  pressed up against my face.

I don’t miss scheduling our day trips around his schedule- the times he needed to be fed, or let out.

I don’t miss the ‘welcoming committee’ who would greet visitors with an extra friendly welcome.

I don’t miss the random barking.  Or barking at all, for that matter.

I don’t miss the short black hairs that would be found all over the house.

I don’t miss the cost of boarding a dog, or the stress of flying with one (although, when the dog crate was put onto the conveyor belt with the luggage, the look on his poor face was priceless!)

I don’t miss walking on freezing mornings, or in the pouring rain.  I don’t miss muddy paw prints in the entry way, or the smell of wet dog. 

I don’t miss walking and being on constant alert for squirrels, rabbits, or anything else that looks like it ‘needs’ to be chased!

I don’t miss chasing him when he decided a ‘fun run’ through the neighborhood was a great idea.  And I certainly don’t miss the helpless feeling when the ‘fun run’ turned into not knowing where he was - for hours.

I don’t miss having a big dog create in my house.

I don’t miss the semi-embarrassment when he would be caught eating the neighbor's cat food out of the bowls in their garage.  Or the time he peed on our cousin’s new puppy.  

I don’t miss the helpless feeling I had seeing my sweet dog shake uncontrollably, out of the blue, and realizing he was having a seizure.

I don’t miss the uneasy feeling I would get when he wasn’t eating… He was a lab.  Labs eat everything, Especially MY lab.

I don’t miss the daily tears that I couldn’t control knowing that cancer was taking over his once energetic body and his days were numbered.

I really don’t miss how empty our house felt after he was gone.  Or the times I’d catch myself looking out the window to see him in the back yard, or walking to the back door to call him, only to remember he wasn’t there.

I don’t miss it.  Any of it.  But, I would do it all over again to have a little more time with my sweet (and crazy) black lab.  I miss him.  Not a day goes by that I don’t think about that crazy black lab.  

The tears are being replaced by smiles and laughter thinking about him and all the fun (and funny, and annoying, and frustrating, and unforgettable) times we shared.

Miss you like crazy Zeke-e-Baby!   

A few of my favorite photos... 


Best Buddies...Last day together :(
We will never forget you Zeke.  We love you forever! 

Friday, May 18, 2012

New Addition to HankOrange!

Meet the newest member of the HankOrange team!


This is my new 'dressform.'  My Grandmother gave me a gift card to Hancock fabrics for my birthday, so I thought I'd put that towards a dressform.  I'd been wanting one for a while, so I am excited!  Of course, I haven't really used her yet, but I have a few projects in mind that will 'require' her help!


I think I need to come up with a name for 'her.'  I'm a big fan of nicknames and I think 'dressform' is pretty boring.  If I'm going to be working with her often, I think she needs a name... suggestions welcome!  What do you think I should call her?


Monday, May 7, 2012

Infinity Scarf Tutorial

Re-fashion a knit dress into an Infinity Scarf


I’ve been wanting to work with knit for a while but I’ve had a hard time finding knit fabrics at the local fabric store.  So, when I found an XL knit dress on clearance at Old Navy for $3, I knew I was going to buy it and give it a try!  Why not!?
Not only did this project take less than an hour, the finished project turned out great!  The first day I wore the scarf I got several compliments.  To me, compliments equal success!

What you’ll need:
·      Serger (it is possible to sew knits on a sewing machine, but I used my serger)
·      XL Jersey knit dress (an oversized t-shirt could work too)
·      Scissors
·      Thread
·      30 minutes

Step one:  Cut off the ‘top’ of the dress.  Now you have one big ‘loop’ of fabric that was previously the skirt of the dress.


Step two:  Cut down one of the side seams of the ‘loop’ creating one long strip of fabric. 

Step three:  (If you want a thicker scarf, you can skip this step!)
Cut the strip horizontally.  Depending on the height of the fabric you have, and the width of the scarf you want, this will determine the number of sections you cut horizontally.  I cut the fabric into two strips.


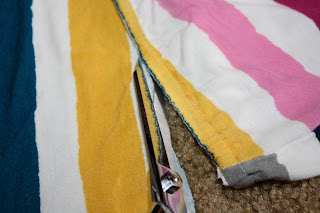
Step four:  Put the right sides of the fabric together and serge on the vertical edge (shortest side).  You should have one long strip of fabric.


Step five: Serge the horizontal edges together (creating a tube essentially), making sure the right sides are together.


Step six: Turn the ‘tube’ right side out.  Almost done!


Step seven: Serge the open ends of the scarf together creating one large loop.  The surged seam will show, but because the scarf will be looped around your neck, you won’t seem the seam.

Step eight:  Put on the scarf and wear with pride!  Wasn’t that easy?! 

Infinity scarf wrapped three times around
Infinity scarf wrapped twice around


Friday, May 4, 2012

$3 + 30 minutes = New Infinity Scarf!


I’m a sucker for a deal.  

I was at Old Navy the other day and saw a ‘clearance’ rack – 40% off lowest marked price.  I couldn’t resist going to check it out.   A striped knit dress caught my eye.  Of course, it wasn’t my size, and I didn’t really even like the dress, but I loved the colors and the stripes!   
I had an idea.  Re-purpose it!  I have been wanting to make an infinity scarf so I figured I could try it.  After all, 40% off $4.91 is $2.95…hello!  I figure, even if it didn’t turn out, can’t beat $3!!  Cheaper than buying fabric.

And, I’m happy to say, I think this little project was a success!  
Gotta love a successful (and easy) up-cycle project!  $3 for a new infinity scarf for spring?  Yes, please! 

Tutorial coming soon!

LinkWithin

Related Posts Plugin for WordPress, Blogger...