Wednesday, December 11, 2013

Infinity Scarf


Infinity Scarves
{New to HankOrange!}

/
Goofy girl in the pic?  Yeah, that's me!

One of my favorite things during the fall and winter seasons is wrapping up in a cozy blanket and curling up on the couch.   

One of my least favorite things about this time of year is being cold.  Especially, when my neck is cold.  Cold wind blowing on my neck, no thank you! 
But, I can exactly go anywhere or run errands with a blanket wrapped around my body {although, it is tempting!}  

And that is why I created the HankOrange infinity scarf.  I can throw on my cozy cotton infinity scarf and keep warm as I’m out and about.  I’ve been wearing mine all the time.  I throw it on after a workout when I’m running errands,  I put it on in the morning when I’m taking little man to school, I wear it when I’m walking the dog!

The scarf keeps me warm and adds a fun touch to any outfit!  
HankOrange infinity scarf.
  
Functional and fashionable.
Get one today from the HankOrange shop
Look for more options coming soon! 


Tuesday, November 26, 2013

Big FIVE!

{Words to my son on his 5th birthday}

How did that happen?  Five?  You are FIVE?


I remember the day 5 years ago very clearly.  You were eight days late and I couldn’t wait to meet you. I couldn’t wait to find out if you were a boy or a girl.

Five years old.  Five.  Woah.

You and I are very similar.  From the cowlick on your head to shape of your chin to the stubbornness you display when something doesn’t go exactly how you wanted.   There is no denying it, you are my son.   

And I am proud of you.

You are creative.  You are sensitive and caring.  And, you are a total ruff and tuff boy. 

You are my sunshine. 
You are my little man.
You are a little smarty pants too.

You are my ‘little lovey.’  I smile when I think of the time you told me, “I like it best when you call me ‘little lovey’.”  I hope that never changes.  Although, I know it will.

You surprise me daily with something you’ve learned or something you remember. 

There are moments {when you ask for the 500th time ‘why’} I think you might drive me crazy, and then there are moments {when you place your little hand in mine while reading together} that I wish would last forever.

I realize that your little hand that fits so nicely into mine will all-to-soon turn into a hand that will encase my own. 

Every day you are growing up and turning from my little boy into a man. 
This momma isn’t ready for that. 
I have enjoyed your first 5 years, little man. 
I want to enjoy this fifth year with you.  Enjoy every minute of it and not allow the time to fly by without stopping to enjoy the little things. 

It is a cliché, but it is true, the past 5 years have flown by.  I’m sure the next 5 will do the same, and the next. 
I am thankful that God gave me you five years ago.  Your ‘little’ ten pound self changed my life forever. 

Happy Birthday, Little Man.  I love you.


Wednesday, November 20, 2013

Gift Bag Tutorial


* Make Your Own * Burlap Gift Bag *
{Quick and Easy DIY}

I was putting together a little gift to give Little Man’s preschool teachers and thought I’d try to create a gift bag.   I wanted something that would be quick and easy and that would also use materials I already had.  Burlap!  I decided to use some burlap I had.  Since burlap is a coarsely woven fabric, I wasn’t worried about making it look perfect or sewing it perfectly. I wanted the ‘raw’ edges of the bag to show, I figured the ‘fraying’ edges would give the bags a more interesting look.   
These bags can be used for any occasion!

Supplies needed:
Burlap
Thread {recommend one the color of the burlap}
Scissors
Sewing machine
Ribbon for handles

{CUTTING}

Decide how big you want the bag to be {mine was about 8” x 6”}
Cut two rectangles from the burlap for the each side of the bag.  

Cut one smaller piece for the base of the bag, making sure it is the same size as the bottom side of the bag {mine was roughly 6” x 2”}. 

Cut two pieces for the sides of the bag, an inch longer than the height of the bag and as wide as you’d like the inside of the bag to be {mine were roughly 9” x 3”}.

Cut two strips of ribbon for handles.  {Mine were about 10” long}  Cut the ribbon longer if you want higher handles, and shorter if you’d like shorter handles.

{SEWING}
Now it is time to sew!
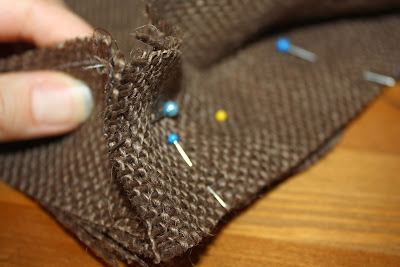
First, I took the large {front and back} pieces and sewed them to the bottom piece.  Since burlap doesn’t have a ‘right’ and ‘wrong’ side to the fabric, it doesn’t matter how you sew it.  Just grab and sew!  Make sure your seams both sewn the same way {raw edges facing out}.


Next, pin the side pieces on, making sure the edge are facing out.  Sew.  While sewing, as you approach the corners of the bag, slow down and make sure you are getting all the layers of the burlap when you sew.  Corners can be tricky.  But, the good thing with the burlap is you don’t have to sew it perfectly because the lines wont’ be as noticeable if they aren’t perfect.


Next, take the ribbon {or whatever you choose to use} for the handles and pin in place.  I pinned my handles roughly one inch from the edges of the bag.


Sew in place.

Cut all the loose threads. {I used white thread, but I recommend using a thread the color of the burlap!}

You are almost done! 
Last step, pull strands of burlap to create the desired look…

And, done!   Fill the bag with whatever goodies you’d like!  
I had Little Man write his teacher's names on paper to make gift tags too.


Easy and unique gift bag!  What will you put in yours?? 


Friday, November 15, 2013

Every Mother Counts

'Like your life depended on it!’

This morning I was in need of some serious motivation while getting my booty kicked in spin class.   I started thinking {daydreaming!} about my friend and spin instructor back in California.  She would often throw out sayings during class to motivate and get us to work harder.   Usually they worked {at least for me!}.


“Do it like your life depended on it,” was a saying she threw out at least on one occasion.  The quote made me think.  My life doesn’t depend on whether or not I work as hard as I can in spin class, or while out running.  I have the ability to bike or to run, or to exercise any way I want.  And go for miles.  


But not everyone is that lucky.   
And, in some cases, a life does depend on how far someone can walk.


This month, along with my fellow Oiselle teammates {and anyone else who wants to join!}, I am raising money for the organization Every Mother Counts through the app called ‘CharityMiles.’

Every Mother Counts is a campaign to end preventable deaths caused by pregnancy and childbirth around the world.

Every day I am going to run {or walk} at least one mile.  Because every mile does count.  Every mother does count.  Someone’s life DOES depend on it!


What are you willing to do for others?

Do it like your life depended on it. 

Because you can.  Because I can.

Because someone’s life does depend on it.

Will you join me in supporting Every Mother Counts?  

I will. 

Every. Mother. Counts


Join me!!  Just download the Charity Miles app onto your phone, and log in before your run {or bike, or walk} and for every mile you log, Every Mother Counts will receive $.25.  Yes, it IS that easy!

Want to do more? You can help fundraise here.  Or, you can shop the Every Mother Counts collection from Oiselle and 40% of the proceeds go directly to EMC.


And, check out this video!  Why We Run Video


Wednesday, November 6, 2013

Reflective Headbands


Now that the days are getting shorter, early morning {and evening} runs are getting darker and darker.  Runners {or dog walkers, or early morning parents walking their kiddos to the bus stop} know that it is important to wear something reflective so you can be seen in the dark. 

HankOrange now has reflective headbands!!  What could be better?!  You can keep the hair in place and out of your face while making yourself visible in the darkness at the same time.  Yes!

The headbands would also be fun in any exercise class that uses a black light! 

Headbands are available in WHITE or BLACK.  
Reflective ORANGE coming soon!! 
 
Get yours from the HankOrange shop, HERE
You need one!


Monday, November 4, 2013

And Along Came Sally


Big news at my house!

We have a new member of our family!   
She has big brown eyes and shiny black hair. 
Her name is Sally. 

We adopted her from a family {who also had ‘Lightening’ and ‘Mator’ – can you guess their favorite movie?!} and we are happy to have her be a part of ours. 

I’m not sure who is more excited about Sally, me, or little man.   Either way, we have a new dog!

Meet Sally, our 3 year old black lab!


Little man took this pic- not the best, but not bad for a 4 year old!


Friday, November 1, 2013

Thankfulness Project: Day One

{Day One: Let the letter writing begin!}  

What you’ll need: 
Paper
Makers, Pens, Crayons {whatever you want to write/ draw the letter with}
Envelopes
Stamps to mail the letters
List of people you are thankful for!! 


Because I wanted him to be excited about this project, I took little man to Target and we bought a pad of paper and some new markers specifically for the ‘thankfulness project.’  We also picked up some stickers from the dollar store.  Of course, you don’t have to buy anything new in order to do this, but I thought {at least for my guy} that having specific paper, pens, and stickers he would use would keep his excitement going a bit longer!

The first thing little man said to me this morning ‘Mommy, today our project begins!’  Yes!  He couldn’t wait to begin and create the first letter. 
He is excited.  I am excited.  Here’s to hoping we can keep the excitement up for the rest of the month!

Today is November 1st, who will you write your first letter to?!


Thankfulness Project


A Daily Project for Kids {and adults}
For the month of November


One thing in life that brings a smile to my face is an unexpected letter from a friend.  By letter, I mean a real pen-and-paper snail-mail letter.  Opening the mailbox and getting a personal letter can totally make my day {or week!}.

There is something about words written on paper by hand that carries so much meaning.  My ‘motivation’ {read, makes me happy} board in my office is mostly covered with letters from friends and family.  Sweet notes that I know were sent to me, only me, with love.  I know the sender took time out of their busy day to sit down and write me the letter.  Whether it was a special birthday greeting, or a ‘saw this and thought of you’ note, or a funny story to share, each letter is special to me.

Little forms of encouragement sent through the mail. 

Growing up my Mom would make me sit down and write personal thank you notes to every person who had given me a gift for Christmas or my birthday.  I hated it, I really did. 

But today, I appreciate the gift of a hand written letter. 

A good friend of mine is a big proponent for writing letters.  Real letters using a pen and pretty stationary.  She doesn’t just write generic ‘thank you’ notes or simple ‘how are you doing’ cards {although, those are important too!}, she pours herself into the letters she writes.  She is a very busy gal, so when I get a letter from her, I know she deliberately took time out of her day to sit down and write me a {top to bottom, front to back card} letter.
This same friend shared this TED talk with me.

After watching the TED talk by Hannah, it made me realize I want to teach my son the same thing.  The importance of a hand written letter. 

He already knows the excitement of getting a personal letter in the mail.  He is thrilled when something arrives in the mail for him {like mother, like son!}.  

November is the month to be thankful {as if we shouldn’t be thankful every other month too!}.  This year I wanted to do something with little man that would be fun, but something that would take more thought and time than just picking one thing we are thankful for each day {although, we will probably do that too!}.  And, I wanted something that might also turn into a little life lesson.   

Every day in November we will pick one {or more} person we are thankful for and write and send a letter to him or her.  

I think this will be fun for us both to do.  I think it will be good for me too.  Giving me an ‘excuse’ to sit and write a letter a day to someone who is important to me and giving me the opportunity to share that with her. 

Hopefully I can brighten someone’s day! 

Let ‘Project Thankfulness’ and letter writing begin! 
Join us!


Monday, October 28, 2013

Chalkboard Vase


{Tutorial & Easy DIY}

I’ve mentioned recently my love for chalkboard paint. 
After creating the pumpkin chalkboard, I wanted to paint something else.  Looking around my house for what I already had, I thought it could be fun to paint a vase!
There are lots of different options already on Pinterest, but here is what I did with mine.

What you will need:
* Vase {mine was a rectangular glass vase}
* Chalkboard paint
* Painters tape


I wanted just a portion of the vase to be ‘chalkboard.’  {But you could paint the whole thing too!}
First, I decided how wide I wanted my ‘chalkboard’ strip to be.  Then I put painters tape on the glass above and below the width of the chalkboard size I wanted.

Next, I painted the open area between the tape. 
Let it dry, and then paint another coat with the chalkboard paint.  I ended up doing three coats.

When the paint is dry, carefully peel off the tape. 
Now, put something fun in your vase and chalk-it-up!

I had planned to tie a thin strip of burlap around the vase and put something festive and ‘fall’ in the vase.

Little man, however, saw it and decided it would be a perfect place for his Legos to hide.   
Sure, why not!  
I guess the vase is multi functional!  And, since you easily erase chalk, it can have multiple identities.

What will your vase hold?!


Monday, October 21, 2013

'Shine Bright, Like a Pumpkin'


 Glitter Pumpkin Tutorial and easy DIY project

Sometimes my little man surprises me.   
Actually, he surprises me all the time, but in this case, I’m referring to his suggestion for a ‘crafty’ thing.
The other day I threw out a suggestion to him that we should decorate a pumpkin. 
His response?  ‘Yes Mommy! Lets decorate a pumpkin with glitter!’  
The Lego-lovin, Superhero-wanna-be, makes-everything-into-a-gun, kid came up with this idea.    
I wasn’t sure how to respond. But I liked the idea!

We ventured to the dollar store and found some little pumpkins I thought we could ‘glitter-up.’ 

Then we made a stop at the craft store for some glitter.   And, after having a long debate about which color glitter to buy  {he was adamant about green or blue, and I was thinking something more neutral}, we compromised with a multi color glitter. 

It turned out to be quite a fun {and messy!} little project.   
I put the glue on, and he would throw {literally!} the glitter on. 

At one point I commented on how shiny the glittery pumpkin looked and, without hesitation, he started singing ‘Shine bright like a pumpkin’ {to the tune of ‘Shine Bright Like a Diamond’ by Rihanna}. 
 
The kid cracks me up.   Never a dull moment, I tell ya!

Now that little tune has become something we say and laugh about together.  And, when I see the sparkly pumpkin all I can think is ‘Shine bright like a pumpkin.’

If nothing else, the glittery pumpkin makes me smile. Especially when I think about our new ‘shine bright like a pumpkin’ tune!

It’s the little things in life, right?

Now, Let the sparkly fun begin! 

Supplies needed:
* Pumpkin {I bought mine at the dollar store}
* Glue
* Glitter
* Bowl for glitter
* Wax paper or something to put on the table while decorating


First, make sure to lay down some wax paper or newspaper to cover the surface where you will be working.  Glitter gets everywhere! Everywhere!

Pour glitter into a small bowl.


‘Paint’ glue onto the pumpkin.   I used a small paintbrush, but you could use a foam craft brush too.  

Scoop glitter up with a spoon and pour onto pumpkin where painted with glue.  Little man used his fingers to scoop the glue, which worked, but it resulted in more glitter on his fingers than the pumpkin!


Let dry.  Repeat on other sections of the pumpkin until completely covered with glitter {or you achieve desired look}.

And done! 
Now you have a new pumpkin to add a little sparkle to your fall décor.


Shine bright!  In this case, like a pumpkin!


Friday, October 18, 2013

Chalkboard Pumpkin


I kind of love chalkboard paint.  In fact, if I wasn’t living in a rental house, I have all sorts of idea of what I could do with it! 

I can’t paint any walls or cabinets, but I wanted to paint something with chalkboard paint.

When little man and I went to the dollar store to buy pumpkins for another project, we bought a four pumpkins.   Since we only used one, I thought
I’d try to paint a pumpkin with chalkboard paint.   Why not!? 

I do like how it turned out.  And, little man loves coloring all over the ‘chalkboard’ pumpkin!  

Super easy.  Inexpensive.

And, a different and fun new surface for little man to decorate!

Make one today!! 

Blue- eyed boy and his pumpkin chalkboard creation!

Wednesday, September 25, 2013

Water Bottle Cover Tutorial


I'm excited because today I have a ‘guest’ on the blog. 
  
This is the first tutorial from my special guest.  She offered to put together a tutorial and I figured I could share it! 
It is an honor to have a little tutorial from her.   
And, I have her to thank for my creative side, or creative ‘genes’ you could say!
Please welcome my extra special guest… {{drum roll please…}}
My one-and-only MOM!


Water Bottle Cover - Free Pattern
{Created by Cheryl}

I have been frustrated this year with my water bottle. Whenever I took it to work, the condensation on the outside was so bad that it actually left puddles on my desk!  When I looked for a pattern, I couldn't find one that would fit my Camelback™ water bottle, so I had to "design" it myself. Hopefully these directions can be adapted for anyone.

Materials Needed:
* Fabric - varies by the size of water bottle; (I needed 11" x 18" + enough for two 3 1/2" circles).

* Batting - to go around your water bottle + overlap; (my piece is 11"x 8 1/2") and a scrap for the bottom
* 1/4" Elastic- about 6" (optional)
* Webbing for strap (optional) (I needed 32")
* Hook and loop tape, 6"- 8"
* Thread (it should match better than mine; I wanted you to see the stitching)


1. Trace a circle for the bottom, and add 1/4" all around.  Cut 2 fabric circles and one of batting.

Measure the circumference of your bottle. Add 1/2" for seams and 3/4-1" for overlap. Measure the height of your bottle.  Double it and add 1/2" for seams and, if you want elastic, add 3/4"-1" for casing.
My cover piece is 11" x 18".  Cut generously. If your batting is thick, you may need more allowance.
Cut a piece of batting the height of your bottle and the same width as your fabric.


2. Put your batting circle between the fabric circles and sew together. I "quilted" mine, but you can just sew around the edges.
Place batting on wrong side of the fabric, matching the edges and covering  one half of the fabric (the side that goes around the bottle).
"Quilt" the batting to the cover.


3. Attach the webbing. Place on quilted side, even with the bottom, up to the top of the batting, allow 12"-14" for carrying, and back down the other side. I had to test where to place it by wrapping it around my bottle so that it would be half- way. My "handles" are 3 1/2" apart. Sew securely.


4. Fold in half, right sides together, and stitch up the sides, leaving ½" open at the top if you want elastic (a good idea if the neck of your water bottle is smaller than the body).


Turn right- side out.  Press carefully, so that the edges of the casing are inside.


5. Zigzag the bottom edges together.  If you want to use elastic, stitch 1/2" casing at the top.
Measure elastic the length you want and add 3/4" - 1" for overlap. Insert in casing; stitch in place at either end.


6. Cut hook and loop tape {velcro} to go about 3/4 of the way down either side, then stitch so that it will overlap.


7. Find your circle. Zigzag around the edges.  Match to the zigzag edge of the "body" of the holder, right sides together. Be careful to position it so that the overlap matches the tape you sewed on. Sew with a 1/4" seam


Turn right side out and Voila!


Time to enjoy your new water bottle holder!

*Thanks for creating the tutorial Mom!

LinkWithin

Related Posts Plugin for WordPress, Blogger...