
* Make Your Own * Burlap Gift Bag *
{Quick and Easy DIY}

These bags can be used for any occasion!
Supplies needed:
Burlap
Thread {recommend one the color of the burlap}
Scissors
Sewing machine
Ribbon for handles

{CUTTING}
Decide how big you want the bag to be {mine was about 8” x
6”}
Cut two rectangles from the burlap for the each side of the
bag.
Cut one smaller piece for the base of the bag, making sure
it is the same size as the bottom side of the bag {mine was roughly 6” x
2”}.
Cut two pieces for the sides of the bag, an inch longer than
the height of the bag and as wide as you’d like the inside of the bag to be
{mine were roughly 9” x 3”}.
Cut two strips of ribbon for handles. {Mine were about 10” long} Cut the ribbon longer if you want
higher handles, and shorter if you’d like shorter handles.

{SEWING}
Now it is time to sew!
First, I took the large {front and back} pieces and sewed
them to the bottom piece. Since
burlap doesn’t have a ‘right’ and ‘wrong’ side to the fabric, it doesn’t matter
how you sew it. Just grab and
sew! Make sure your seams both
sewn the same way {raw edges facing out}.

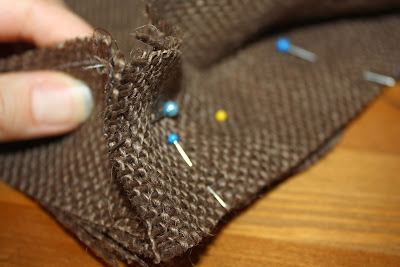
Next, pin the side pieces on, making sure the edge are
facing out. Sew. While sewing, as you approach the
corners of the bag, slow down and make sure you are getting all the layers of
the burlap when you sew. Corners
can be tricky. But, the good thing
with the burlap is you don’t have to sew it perfectly because the lines wont’
be as noticeable if they aren’t perfect.


Next, take the ribbon {or whatever you choose to use} for the handles and pin in place. I pinned my handles roughly one inch from the edges of the bag.


Sew in place.
Cut all the loose threads. {I used white thread, but I recommend using a thread the color of the burlap!}
You are almost done!
Last step, pull strands of burlap to create the desired
look…
And, done! Fill the bag with whatever goodies you’d
like!
I had Little Man write his teacher's names on paper to make gift tags too.
I had Little Man write his teacher's names on paper to make gift tags too.


Easy and unique gift bag! What will you put in yours??
No comments:
Post a Comment